ChatGPT-4 update: Can we understand and fix VMware VM problems
To write the original blog post about VM issue fixing I used ChatGPT-3.5.
As promised here comes the update post, where I repeat the exact same steps with ChatGPT-4.
Quick reminder, we had a VM with high CPU Co-stopping values and wanted to understand what that means. As the issue was caused by CPU resource limits, we asked ChatGPT-3.5 to come up with a PowerCLI script to remove that limit ... and that didn't go so well.
Let's see how this goes.
I start with the first question to get an explanation about the metric.
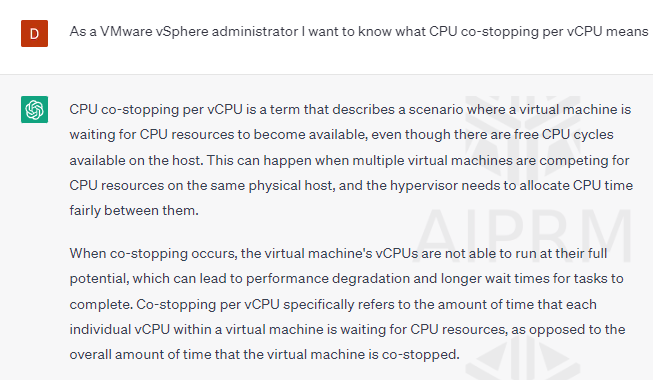
Question: As a VMware vSphere administrator, I want to know what CPU co-stopping per vCPU means
Reminder - that one was Chat-GPT 3.5
ChatGPT-4 let's get an upgrade
ChatGPT answered in detail:
CPU co-stopping, also known as co-stop or CPU Ready, is a performance metric in VMware vSphere that measures the amount of time a virtual CPU (vCPU) spends in a "wait" state, unable to execute instructions, due to other vCPUs being busy or waiting for resources. In other words, it reflects the time a vCPU spends idle, waiting for other vCPUs in the same virtual machine (VM) to catch up before they can proceed with executing tasks.
In a virtualized environment, vCPUs are mapped to physical CPU cores and share resources with other vCPUs. When multiple vCPUs are assigned to a VM, the hypervisor tries to schedule all the vCPUs for simultaneous execution on the physical CPU cores. However, due to resource contention or other factors, it may not always be possible for all vCPUs to execute simultaneously. In such cases, the hypervisor holds back some vCPUs, leading to CPU co-stopping.
High CPU co-stopping values can negatively impact the performance of a VM, leading to slow response times or sluggish performance. To minimize CPU co-stopping, consider the following best practices:
Right-sizing VMs: Assign the appropriate number of vCPUs to each VM based on its actual workload and resource requirements. Over-provisioning vCPUs can lead to increased contention and higher co-stop values.
Load balancing: Distribute resource-intensive VMs across multiple hosts to reduce resource contention and improve overall performance.
Affinity rules: Use CPU affinity rules to pin vCPUs to specific physical cores, ensuring that critical VMs get consistent access to CPU resources.
Monitoring and alerts: Regularly monitor CPU co-stopping and other performance metrics to detect potential issues early and take appropriate action.
Optimize CPU scheduling: Adjust the hypervisor's CPU scheduling settings to reduce co-stop, such as setting the 'CPU Reservation' and 'CPU Shares' values to prioritize critical VMs.
That would definitely save some time looking around and it gave also the clue regarding CPU reservation (not solving my issue yet, but getting there).
Feed more details to the metrics we have issues with
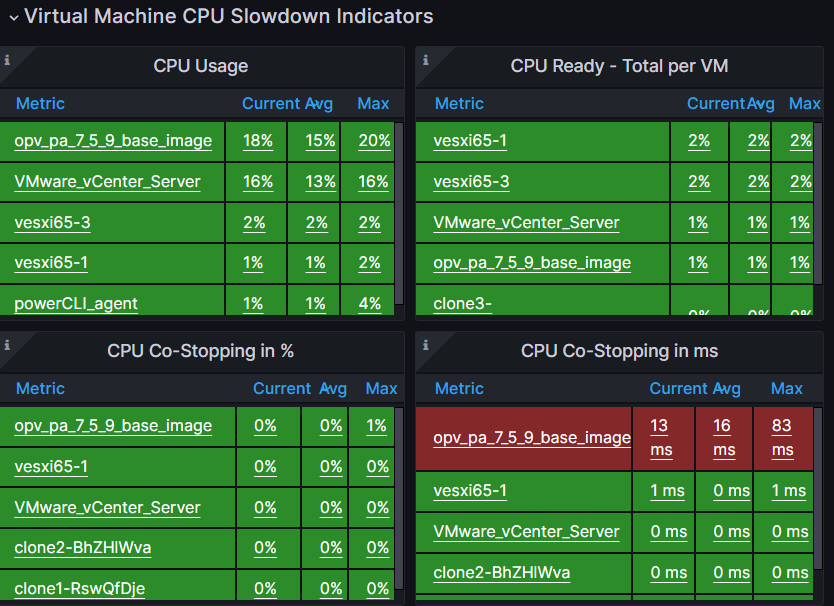
Question: As a VMware vSphere administrator I want to understand CPU-Co Stopping that is shown in Milliseconds
ChatGPT-4 Answer:
When CPU co-stopping is shown in milliseconds (ms) in VMware vSphere, it refers to the amount of time, in milliseconds, that a virtual CPU (vCPU) spends in a "wait" state, unable to execute instructions due to other vCPUs being busy or waiting for resources.
CPU co-stopping is a performance metric that helps administrators understand the level of contention and synchronization between vCPUs within a virtual machine (VM). It is important to monitor this value, as high co-stop values can lead to degraded VM performance and slow response times.
To better understand the significance of CPU co-stopping in milliseconds, consider the following example:
If you have a VM with four vCPUs and a CPU co-stopping value of 2000 ms, this means that during a specific time period, at least one of the vCPUs has spent a cumulative 2000 ms in a "wait" state, unable to execute instructions due to the other vCPUs being busy or waiting for resources.
Additionally, the same recommendation part was shown again.
Nice, but what about the details when it comes to sizing?
I continue with the exact same questions and question sequence as with ChatGPT-3.5 some weeks ago.
Question: what are the most common issues when it comes to sizing that causes high CPU Co-stopping?
Answer:
High CPU co-stopping can occur due to various issues related to VM sizing and resource allocation in a VMware vSphere environment. The most common issues that can cause high CPU co-stopping include:
Over-provisioning of vCPUs: Assigning more vCPUs to a VM than required by its actual workload can lead to increased contention and high CPU co-stopping. When a VM has too many vCPUs, the hypervisor must wait for all vCPUs to be scheduled simultaneously, leading to delays and inefficiencies.
Improper allocation of resources: Incorrectly allocating resources such as CPU, memory, and storage can cause contention and negatively impact VM performance, leading to high CPU co-stopping. It is crucial to monitor and adjust resource allocation based on the actual needs of the VMs and their workloads.
Resource contention: When multiple VMs with high resource demands are running on the same host, they compete for the same physical resources, which can lead to resource contention and high CPU co-stopping. Properly distributing VMs across hosts and balancing resource utilization can help minimize this issue.
Inadequate host resources: If the physical host has insufficient resources to accommodate the demands of all running VMs, it can result in high CPU co-stopping. Regularly monitoring host resource utilization and upgrading hardware when necessary can help alleviate this issue.
Inefficient CPU scheduling: If the hypervisor's CPU scheduling settings are not optimized, it can lead to increased CPU co-stopping. Adjusting settings such as 'CPU Reservation' and 'CPU Shares' to prioritize critical VMs can help reduce co-stop values.
To mitigate high CPU co-stopping, consider the following best practices:
Right-size VMs: Assign the appropriate number of vCPUs based on the VM's workload and resource requirements.
Monitor performance: Regularly monitor CPU co-stopping and other performance metrics to detect potential issues early and take appropriate action.
Load balancing: Distribute resource-intensive VMs across multiple hosts to reduce resource contention and improve overall performance.
Use affinity rules: Apply CPU affinity rules to pin vCPUs to specific physical cores, ensuring consistent access to CPU resources for critical VMs.
Optimize CPU scheduling: Adjust the hypervisor's CPU scheduling settings to reduce co-stop, prioritizing critical VMs when necessary.
The Result is definitely more precise and also more comprehensive than the former ChatGPT version.
Start to fix the issue
Question: How can I fix that?
As this one is probably the most interesting answer, let's first check the 3.5 release again.
Version 3.5 answer:
To fix issues related to CPU co-stopping caused by sizing problems, there are several steps that VMware vSphere administrators can take:
-
Right-size virtual machines - Ensure that virtual machines are properly sized to meet their workload demands without consuming unnecessary resources. Use tools like VMware vRealize Operations or Opvizor to help identify oversized virtual machines.
-
Evaluate host resources - Check that the physical host has enough CPU resources to meet the demands of the virtual machines running on it. Consider adding additional hosts or upgrading existing hosts if necessary.
-
Optimize resource allocation settings - Configure resource allocation settings such as CPU affinity and reservations to ensure that virtual machines are receiving the resources they need without monopolizing CPU resources.
-
Monitor resource usage - Regularly monitor resource usage using tools like vRealize Operations or Opvizor to identify potential issues before they cause problems.
By taking these steps, VMware vSphere administrators can help minimize CPU co-stopping and ensure that their virtual environments are running at peak performance.
Version 4 answer:
To fix high CPU co-stopping in a VMware vSphere environment, consider the following best practices and steps:
1. Right-size VMs: Analyze the VM's workload and resource requirements, and adjust the number of vCPUs accordingly. Avoid over-provisioning vCPUs, as it can lead to increased contention and high CPU co-stopping.
2. Monitor performance: Regularly monitor CPU co-stopping and other performance metrics using tools such as vSphere Performance Charts, esxtop, or third-party monitoring solutions. This will help you detect potential issues early and take appropriate action.
3. Load balancing: Distribute resource-intensive VMs across multiple hosts using VMware Distributed Resource Scheduler (DRS) or manual load balancing to reduce resource contention and improve overall performance.
4. Use affinity rules: Apply CPU affinity rules to pin vCPUs to specific physical cores, ensuring consistent access to CPU resources for critical VMs. This can help reduce CPU co-stopping, especially for latency-sensitive applications.
5. Optimize CPU scheduling: Adjust the hypervisor's CPU scheduling settings to reduce co-stop. Configure 'CPU Reservation' and 'CPU Shares' to prioritize critical VMs and ensure they have adequate access to CPU resources.
6. Upgrade hardware: If the physical host does not have enough resources to accommodate the demands of all running VMs, consider upgrading the hardware (e.g., adding more CPU cores or increasing memory capacity) to alleviate resource contention.
7. Optimize VM configurations: Review and optimize VM configurations, such as disabling unnecessary hardware devices or services, to reduce resource demands and potential contention.
8. Review resource pools: If you are using resource pools, ensure that they are configured correctly, with appropriate resource allocation and shares for each pool.
9. VMkernel settings: Check VMkernel settings and ensure they are optimized for your environment. For example, you may want to enable or disable hyper-threading, depending on your specific use case and hardware.
10. Keep software up-to-date: Regularly update your vSphere environment, including ESXi hosts and VM tools, to take advantage of performance improvements and bug fixes.
By implementing these best practices and monitoring your environment regularly, you can effectively address high CPU co-stopping and improve overall VM performance in your VMware vSphere environment.
Result: Comparing the two answers given by the different versions shows some significant improvement. It's hard to believe that the 2 versions have been released within a few months (I guess they were only holding back release 4).
Do we get to a fix?
Exactly as last time, I know the issue is the CPU limit and I want to get a PowerCLI script to remove the limits. That was the time when ChatGPT-3.5 eventually failed.
WARNING: Best to test these results with accounts that have limited permissions or change the scope (i. e. $vms = Get-VM myTestVM) or use whatif in combination with Set CmdLets (Set-VMResourceConfiguration -VMResourceConfiguration $vmResourceConfig -CpuLimitMhz -1 -whatif)
Question: Create a PowerCLI script that removes all CPU lmits of my virtual machines
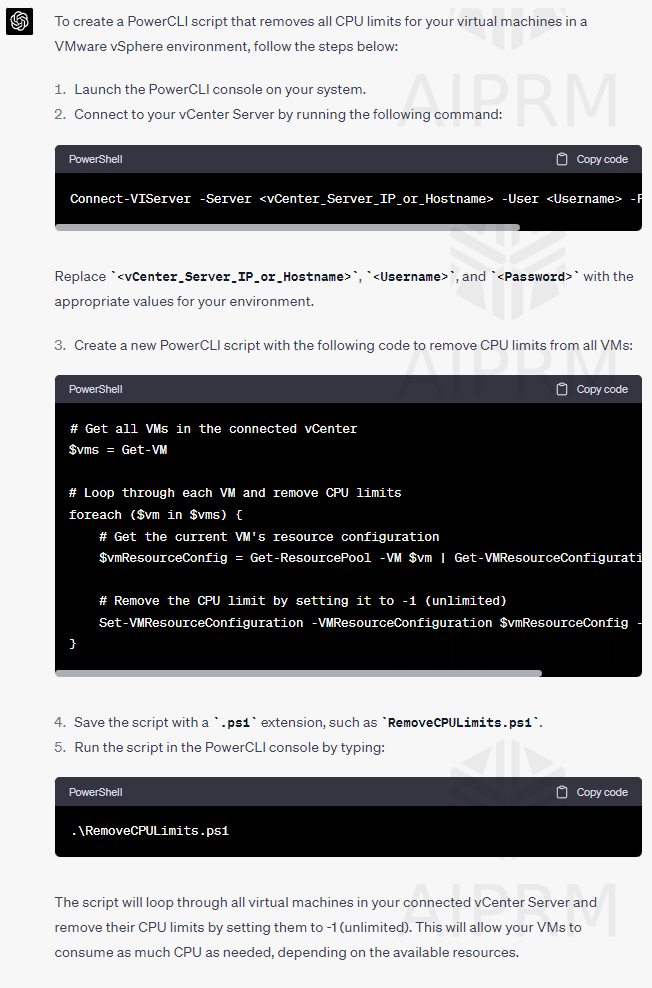
Result: While it's impressive at first glance (as always), it's wrong again. Even without trying it out, it doesn't make much sense to execute get-resourcepool to get to a VMs resource configuration.
Still, i want to run the command and give it another try.
Question: the get-resourcepool is not correct and I get the following error "Get-VMResourceConfiguration: The input object cannot be bound to any parameters for the command either because the command does not take pipeline input or the input and its properties do not match any of the parameters that take pipeline input."
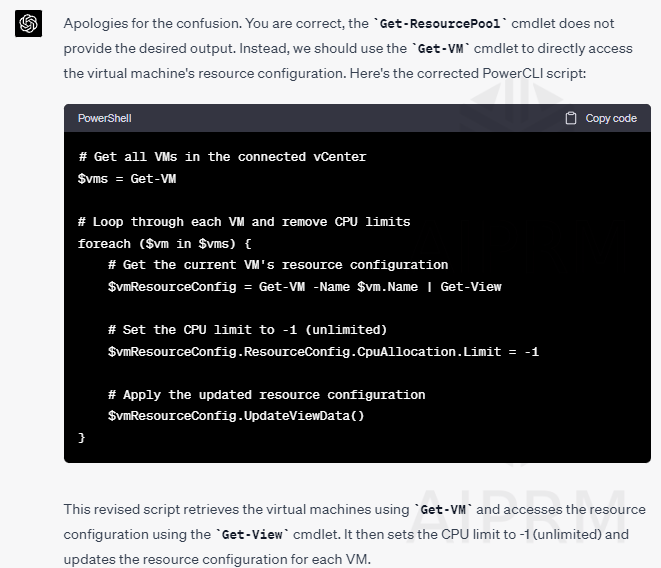
and down the rabbit hole, we go.
1) I personally hate to send the wrong object. Powershell is very relaxed and accepts everything, but it slows down the execution time in larger environments. So please just use the correct type.
$vmResourceConfig = $vm | Get-View
instead of $vmResourceConfig = Get-VM -Name $vm.Name | Get-View
and your script runs at least twice as fast.
2) while $vmResourceConfig.ResourceConfig.CpuAllocation.Limit works to read the configuration setting, this way of setting it doesn't work.
3) UpdateViewData() enables you to update the whole view or specified view property. It doesn't update the actual configuration. That means you can refresh the view object or add a property that wasn't there before.
Example:
$vmhost = Get-View -ViewType HostSystem -Property Name
This command doesn't contain the property parent yet, but using $vmhost.UpdateViewData('Parent') adds the Parent property to the $vmhost object.
Nevertheless, it doesn't change a thing on the ESXi or the VM itself.
And then we made it
Question: UpdateViewData is not updating the real VM configuration, its only meant to update the object in PowerShell
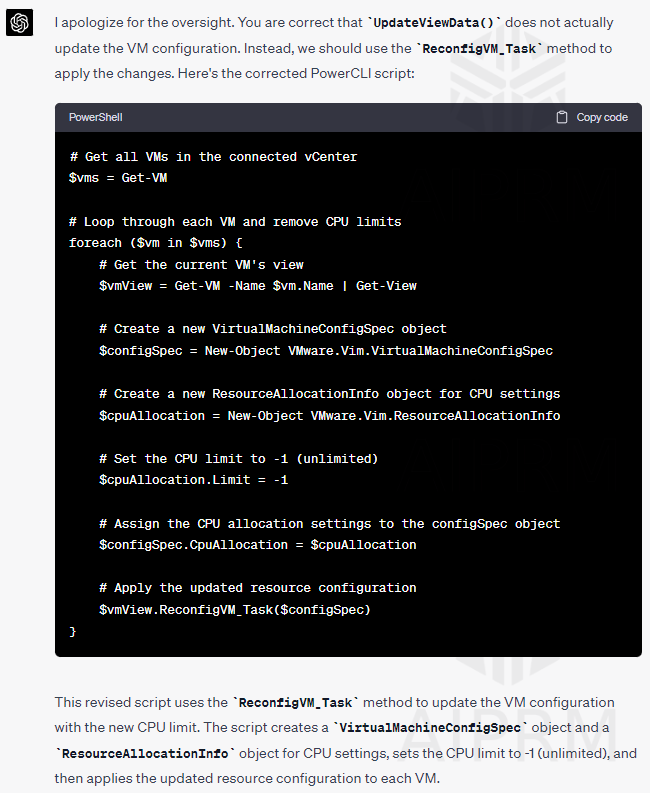
Result: While the script is not optimal it works! That is a big step forward. Especially for people without much experience, there is a way to get a script done that actually works. Unfortunately, you still need to go back and forth and feed ChatGPT with the errors to get to a result, BUT we're getting there.
In case you mainly read the post to get a script that runs as fast as possible, here would be the change to the ChatGPT result:
# Loop through each VM and remove CPU limits
foreach ($vm in (get-view -viewtype virtualmachine)) {

    # Create a new VirtualMachineConfigSpec object
    $configSpec = New-Object VMware.Vim.VirtualMachineConfigSpec

    # Create a new ResourceAllocationInfo object for CPU settings
    $cpuAllocation = New-Object VMware.Vim.ResourceAllocationInfo

    # Set the CPU limit to -1 (unlimited)
    $cpuAllocation.Limit = -1

    # Assign the CPU allocation settings to the configSpec object
    $configSpec.CpuAllocation = $cpuAllocation

    # Apply the updated resource configuration
    $vm.ReconfigVM_Task($configSpec)
}
Conclusion
What started out of curiosity turned into some nice learning exercise. It's definitely worth using the exact same flow with different versions of ChatGPT and future other LLM systems and comparing the results. Of course the more you train the system about your topic the more precise and valuable is the outcome.
What did we learn?
- NEVER run the scripts provided in production environments or with elevated permissions, before you really tested these in non-production.
- ChatGPT-4 is good and much better than 3.5
- With a little bit of training and patients you get results
- The results eventually work, but are not optimal
Let's finish with the conclusion from our OpenAI friend:
In conclusion, we hope this blog post has provided you with valuable insights and practical tips to enhance your virtual environment's performance and efficiency.
By staying informed about best practices, monitoring performance metrics, and fine-tuning your VM configurations, you can ensure optimal resource utilization and improve the overall user experience.
Remember, staying proactive and addressing potential issues early on is the key to maintaining a robust and high-performing virtual infrastructure. We encourage you to continue exploring and expanding your knowledge in this ever-evolving field.
As always, please feel free to share your thoughts and experiences in the comments section below, as we believe that a thriving community fosters learning and growth. Stay tuned for more informative blog posts, and happy virtualizing!